CANOSCAN
Scanning with Canon-brand Scanners
This guide is for scanning based off our experience with a CanoScan 9000F Mark II. This may or may not be able to be applied to other Canon scanners.
You’ll need to install the CanoScan software that came with your scanner. This should include software called “ScanGear” or “Canon IJ Scan Utility”. When opened it will look like this:
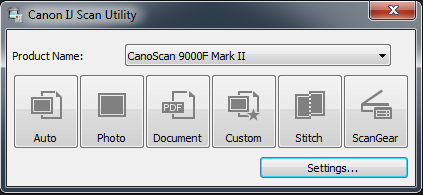
Click the ScanGear button on the right side to get started. You’ll be presented with a screen similar to this:
Advanced settings
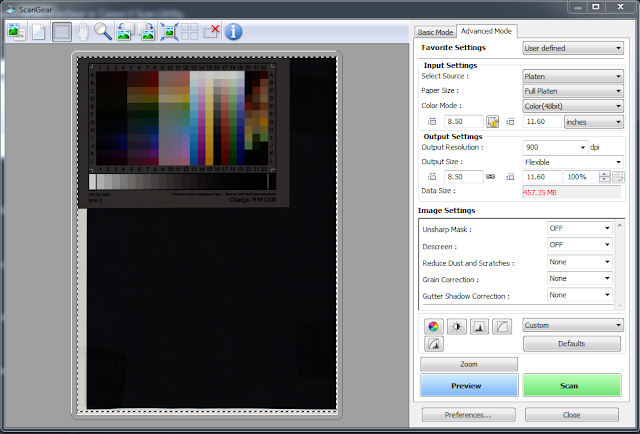
To get a clean untouched “flat” scan at the best quality we’re going to need to adjust settings. It’s best to click the Advanced Mode tab along the top to begin with. You’ll want to set your settings to the following:
- Color Mode - 24-Bit is fine, but if you want to do 48-bit there are instructions in the section after this one on how to enable.
- Output Resolution - 1200DPI
- Unsharp Mask - Off
- Descreen - Off
- Reduce Dust and Scratches - None
- Grain Correction - None
- Gutter Shadow Correction - None
The result of these settings will be a pure scanner sensor output. It will result in a “flat” scan that may not look pretty and fairly dull. However, this preserves the untouched image data for archival purposes and with an IT8 profile we can create and attach later it will look much better.
Now you are ready to scan in your items in high quality with your CanoScan 9000F Mark II!
Enabling 48-bit (not required)
If you want to enable 48-bit scanning continue below. Again this is NOT required.
- Click the Advanced Mode tab along the top if you’re not in that mode already.
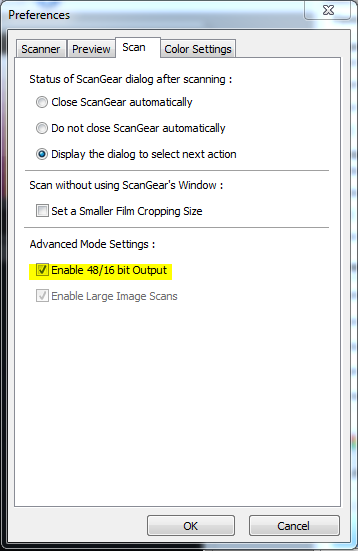
- Click the Preferences button along the bottom of the screen.
- Go to the Scan tab of the Preferences window.
- Make sure Enabled 48/16 bit Output is checked.
See highlighted picture below:
This will allow you to select 48-bit mode from your Canon Scanner if you choose to do so in the main scanner window.