Post Production/Editing
If you've already scanned using the guidelines and tutorials and have successfully preserved a RAW scan then you've already done a great service to the preservation community! However if you want to clean up and improve your images and release them in a non-RAW format we can give you a few tips here. This is by no means a perfect method, there are honestly no perfect methods with post production/editing of images because it will always need to be specifically tailored to whatever the desired image is intended for. But we can give some general advice here at the very least!
Be sure you realize that we ALWAYS want to keep your RAW images. Do NOT overwrite them with the ones you create in post production/editing. The whole reason we want to preserve the RAW scans above all else is so you and others can take those and tweak them to whatever they need in Post Production/Editing. Consider them like a master file, and always make sure you upload them somewhere safely without ANY edits outside of attaching an IT8 profile and 90 degree rotation. Those are the only two edits you should ever need to add to a RAW image and both are reversible so it's okay to do them.
Levels
Leveling your image in photo editing software is one of the best things you can do in order to make an image “pop”. I'm not going to go into all of the specifics behind it, I'll leave that to you and google if you want to get a deeper understanding. However I'll be glad to show you some easy basics that will help improve your images. I'll be working in Adobe Photoshop but the principals should be similar in other image editing software. First off let's open up a RAW image scan I did. This is a section of the box for Dragon Quest 3 for the Super Famicom. I scanned this with my Epson V550 with Epson Scan software at 1200DPI and 24-bit color with no color corrections added. So it looks to be a very bland and flat scan.

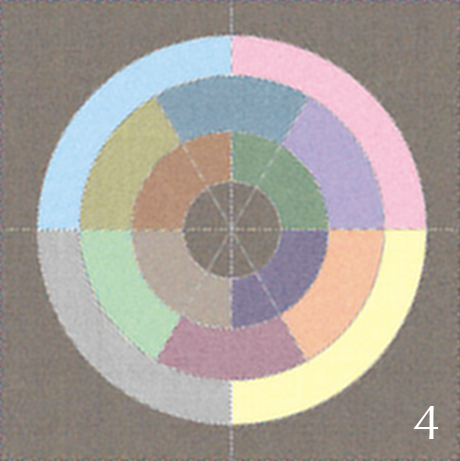
As noted in the IT8 Calibration section of the guide I recommend attaching your proper IT8 calibration profile to them before saving RAW images. For this however I'm just showing this as an example to show you a comparison of before and after with IT8 profile attached. So I'm going to attach the profile now and show what we get.

Not bad! The colors have definitely improved but the contrast of the image still makes it feel dull. That's where leveling can come in and help improve things. In Photoshop we'll go to Image - Adjustment - Levels and we'll be presented with this.
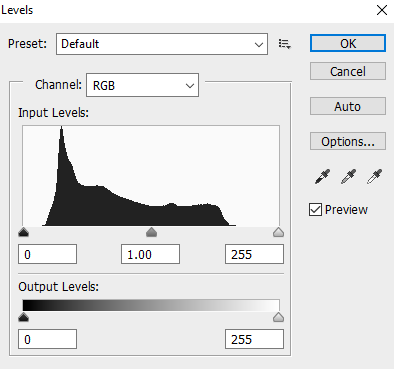
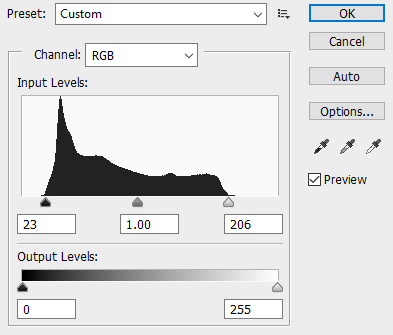
First off there is no perfect way to level an image as every image will be different and you'll need to eyeball them for your own uses. However there are some good general tricks you can use. If you notice the channel drop down box shows RGB. This basically is showing you all 3 channels together and lets you adjust them all together at once. This works fine for the most part but it's not a bad idea sometimes to manually go into each channel and adjust them, it really just depends on how much work you want to put into it. But to keep things simple lets just work with the RGB channel. If you notice along the bottom of the Input Levels section there are three sliders - a black, grey, and white one. The black and white ones are the ones you'll generally be adjusting. They tell Photoshop at what point we want colors in the image to be true black or true white and anything we pass them by with is made that way. What we're going to do is slide each just to the outside edges of where the black lines in the histogram appear so it should look like this.
Now after doing that adjustment our image looks like this!

Much better! But there are some other useful tricks we can use while leveling.
If we hold down the ALT key while moving our sliders Photoshop will tell see what pixels it is making either true black or true white depending on the slider you're using. This is useful for when you know you have shades of black or white that should be true black or white but weren't picked up that way for various reasons and you need to visualize what you're doing while adjusting.
Another tip is to set the black and white points with the droppers.

Black is on the left, grey is in the middle, and white is on the right. I generally just use black and white droppers, but the grey is useful for removing color casts if your image has one. Basically you click the eye dropper of your choice and click it on a part of your image you want to say is the blackest or whitest point of the image and it will adjust accordingly. One thing I recommend here though is making sure your sample size is 5×5 which you can set in Photoshop in the upper left corner.

While this can be a quick and easy way to level your image you have to be careful as it can easily cut off details you don't want to lose in darker or lighter areas. You'll honestly just need to experiment with your image and decide what method you think is best, or combine them! Sometimes I adjust my RGB channels just outside of the histogram like the above example and then set my black or white points with the droppers. It really just depends on what ends up looking best.
Last thing I want to touch on is the difference between the histograms on 48-bit vs 24-bit images which is where you can make an argument for using 48-bit, however I still argue that unless you are doing multiple major leveling edits you should be fine with 24-bit. A 48-bit histogram is much “wider” so when you make changes to it you don't lose information as easily, most of this information is rarely visible to the human eye however unless as I said you're doing multiple major edits. The methods we've gone over above that made the image looked much improved were not major edits in my opinion so 24-bit worked fine.
Converting Color Spaces and Bit Depths
This will only effect you if you're working with IT8 calibrated or 48-bit scans. If you aren't you shouldn't need to worry about this step.
The vast majority of screens, printers, and programs can only render the SRGB color space correctly. It's the industry standard and it's what you'll need to convert your edited images to or else they will show up incorrectly (Usually dark and bland like a RAW scan without a IT8 profile attached) So before saving our edited images we'll need to convert them to SRGB.
In Photoshop we do this by going to Edit - Convert to Profile.
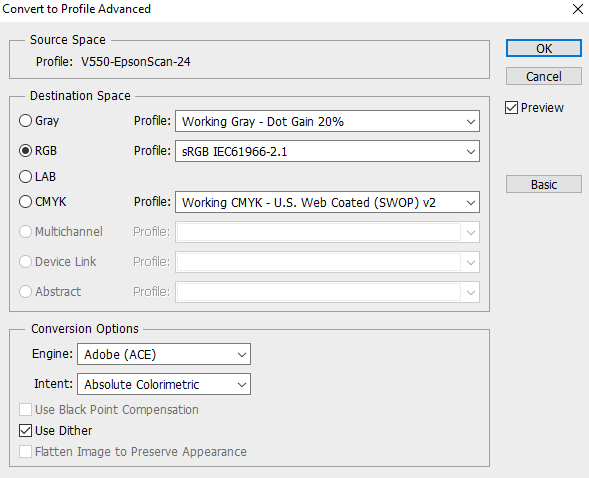
Once there check the box for RGB and make sure it's set for an SRGB profile. Along the bottom I recommend the Adobe (ACE) Engine and the Intent to do Absolute Colorimetric, you can also choose Perceptual but I personally prefer how my scans look with Absolute, I'll leave it up to you to decide which you like as like I said editing is subjective. Once this is done your image will be in the sRGB colorspace and should look correct on most programs.
If you are working with 48-bit RAW images I'd also recommend reducing your bit-depth down to 24-bit after your edits. You can do this by going to Image Mode and checking the box for 8 Bits/Channel. This will help with compatibility issues for programs that don't decode 48-bit properly which is more than you might imagine.
File Format
For our RAWs we keep them in TIFF or PNG as these are lossless formats. However because of them being lossless they are large images. For our edited images I'd recommend saving them as JPEG at a quality level or 9 or 10 if you can. This will drastically shrink the file size down and though they are no longer lossless they should still look excellent and will now be much easier to share and use in this format. I'd recommend shrinking the DPI down to 300 or 600 as well. I personally go with 600 but if you need to make the file sizes even smaller 300 should still look good. You can do this in Photoshop by going to Image - Image Size and adjusting that number in the resolution section.
Descreening
Descreening can help improve edited images ad it gets rid of the screen pattern that is common on A LOT of what we scan. The left image below shows what I'm referring to and the image on the right is the same but with the screen removed via software.
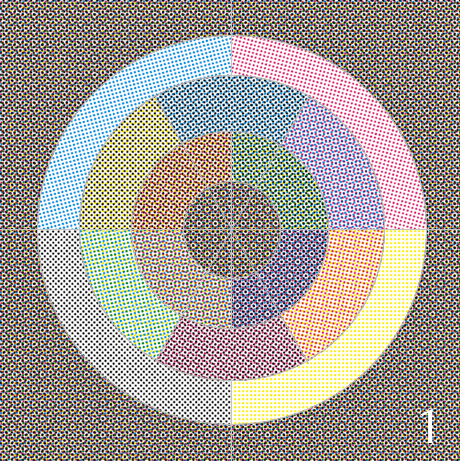
The right looks much better right? However as you might notice the process blurs the image slightly. This is an unfortunate side effect but still looks better than with the screen still there.
So how do we descreen our images? Scanners usually have a hardware option for this when scanning but we DO NOT recommend this. For one it ruins our RAW image scans as it alters them, which is something we never want. The other options are via software and there is a very good plugin for Photoshop that does a good job with this called Sattva Descreen. Unfortunately it's not free and you'll need to buy it here if you decide to go to the trouble of descreening your images. The Home Edition is much cheaper than the Professional version and is suitable for our uses. Of course if you don't mind spending the money Professional's additional features of the tuning of the Moiré reduction setting and the noise reduction can be useful too. Though sometimes they can do more harm than good so it's not a major loss if you go with the Home edition.
Once you've purchased and installed the plugin it's pretty straightforward to use. If you pull it up from Filter - Sattva - Descreen you'll see a window like this -

Usually the plugin will automatically detect the screen and descreen it for you. I recommend leaving Reduce a moire checked as well. Noise reduction if you go for the professional version can make your images look better but it can also blur out important details in my opinion and I usually leave it off unless I see noticeable improvement from it. Lastly you can also check Automatic and it will try to figure out the screen on it's own without your adjusting it with the “Screen, lines/inch” bar and it usually does quite a good job. If you click the grey box next to Screen, lines/inch it will try to detect the screen and adjust itself. This may be necessary when the section of the image it's showing doesn't have a screen it can pick up properly. So you may need to move it around by clicking and dragging on the image itself or zooming in or out with the + and - buttons in the lower left corner.
Now here's the catch, a lot of scans have different frequencies of screens on them, especially manual and magazine pages I've noticed or at least the way Sattva detects them. I generally don't apply Sattva when it shows anything below 150 or 130 at the ABSOLUTE most. If you go lower than 150 you'll get some pretty bad blurring which can effect clarity of text quite a bit and I don't recommend it generally. One way to do this the most correct way is to draw selection boxes in Photoshop around sections that you know have screens on them and run the Sattva plugin on them either one at a time or in a batch. This helps you descreen images without blurring text. However this isn't always possible especially when text is on top of a screen section. It's also more time consuming as you'll be doing screens in chunks per image. 150-175 screen, lines/inch run across the entire image is safe if you don't want to mess with it and while it will blur your whole image slightly it's much better looking in my opinion than leaving the screens there. Generally when I am doing a large batch of manual or magazine pages I manually set it to 150 or 170 and record it in an “Actions” batch process and just live with the results. It will fail on some pages however and leave them open which can consume a lot of RAM if you're not careful so be sure to do it in small batches or have a computer with a large amount of RAM or you'll risk a computer locking up or Photoshop crashing. Not sure what an Actions batch process is? Let's move on to the next section and talk about it.
Photoshop Actions / Batch Processing
With scanning you're going to be doing A LOT of the same things to your images over and over again. Seems like a pain to manually do this doesn't it? Luckily with Photoshop (and other photo editing programs) we're able to use what's known as “Actions” that are repeatable things we do to our images we can record and “playback” against a batch of them to avoid having to manually do it to each and every image. It's a massive sanity and time saver and also takes out pesky human error. Again I am used to Photoshop so will only be going over how to do it in that. But if somebody wants to write up how they do it with other photo editing programs I can gladly add that as well.
I'll go over two of my most used Action sets I use in Photoshop with my scans and how I create them. The first is a basic one that takes my RAW TIFF images from my scanner, applies my IT8 profile, and saves my images as a PNG. So how do we set this up?
We're going to need to open an image file up that doesn't have anything done to it yet, just a RAW TIFF scan from our scanner and scanning software of choice. Now in Photoshop we need to make sure our Actions window is open so go to Window and select Actions. It should look something like this -
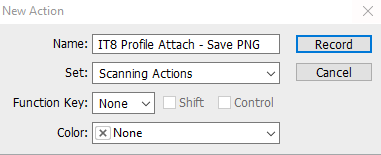
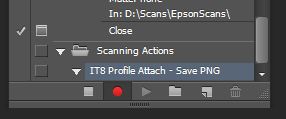
Along the bottom of this window you'll see six buttons you can click on, some are greyed out. First off lets create a new action set by clicking the folder icon and naming it “Scanning Actions”. Next I want you to click on the icon directly to the right of the folder that looks like a piece of folded paper. This creates a new action so go ahead and click on it and name it “IT8 Profile Attach - Save PNG” as that's what we'll be doing in this action. I likely naming my actions with good descriptions as it makes them easier to reference later especially if you make a lot of them.
Now you'll notice we have to hit a button called Record to save our action. What this means is now EVERY thing we do to our image it is going to be recorded until we hit the stop button. You should notice that the record button is now lit up red along the bottom of the actions pane.
So let's go ahead and do what we want our action to do. I'm going to first attach my IT8 profile to this image. I scanned this image in Epson Scan in 24-bit so that is the profile I will select from Edit - Assign Profile. You however will have to do this with whatever IT8 profile you've created if you've created one at all. If you haven't created one just skip this step as you can't record something you can't do.

Now that's done, I want to save my image as a PNG instead of a TIFF due to the fact that it compresses better and is still lossless. So I'm going to go up to File - Save As - and then put the file in the folder where I want it to save and change my extension to PNG.
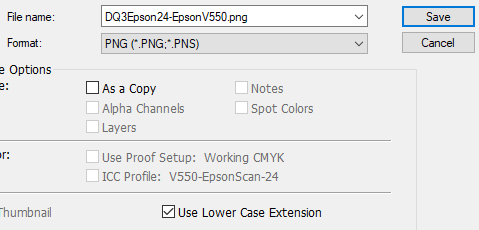
Now here's an important thing to note, if you choose to Save As and point it to a folder it will drop ALL images you run this Action against in the same folder so just keep that in mind. If you're wanting it to save or overwrite it the same folder as the image you're editing with an action you'll need to choose Save instead of Save As. Choose depending on what you want it to do.
Lastly I don't want to leave the image open after I have saved my changes so I'll click File - Close it shouldn't ask for confirmation since we've saved the image changes already but if you are working with an image and you didn't save it it will prompt you for your response AND remember it, so that will also apply to whatever images you run your action against. Like i said it is recording EVERYTHING you are doing so just keep that in mind if you end up getting unexpected results from your actions.
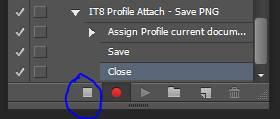
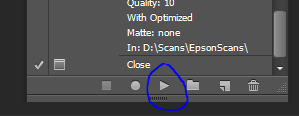
Now that our image is closed we want to stop recording anything further on this action. Click the Stop button at the bottom of your actions task bar to do this.
And with that we are done! Our action is successfully recorded and if you did it correctly it should look something like this.
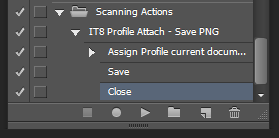
You may have noticed the trashcan icon along the bottom of the bar on the far right as well. That let's us delete action sets, or just specific sections of the action if we messed up and recorded something we didn't want to. Simply highlight the action or section of the action you want gone and click the trashcan and and confirm it.
Now that we've created an action how do we use it? Well for this case I commonly use this action to attach my IT8 profile and convert my TIFFs to images after I've scanned a large batch of them all at once. That way it will process them one by one and what I want done without me manually having to do it which saves time and also means I don't have to babysit the process and wait while each of my PNG files save as it takes awhile to save 1200DPI PNGs let me tell you. I can walk off and have a beer and come back and they'll all be done for me!
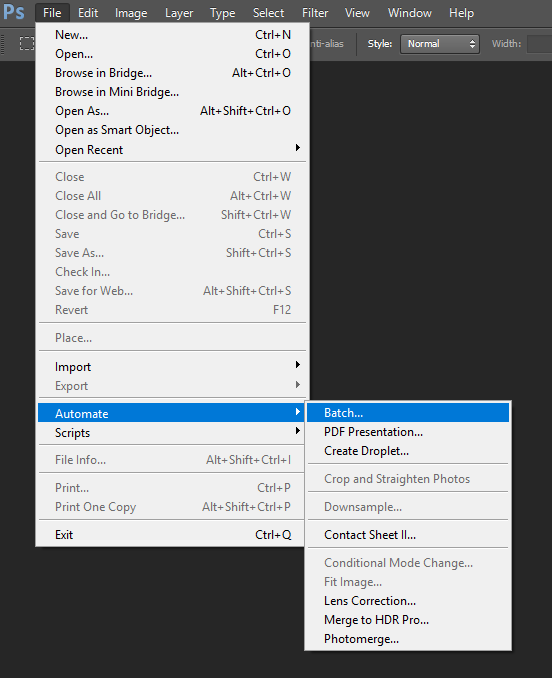
So let's do just that, go up to File and Automate and then pick Batch.
Now you'll see a window like this -
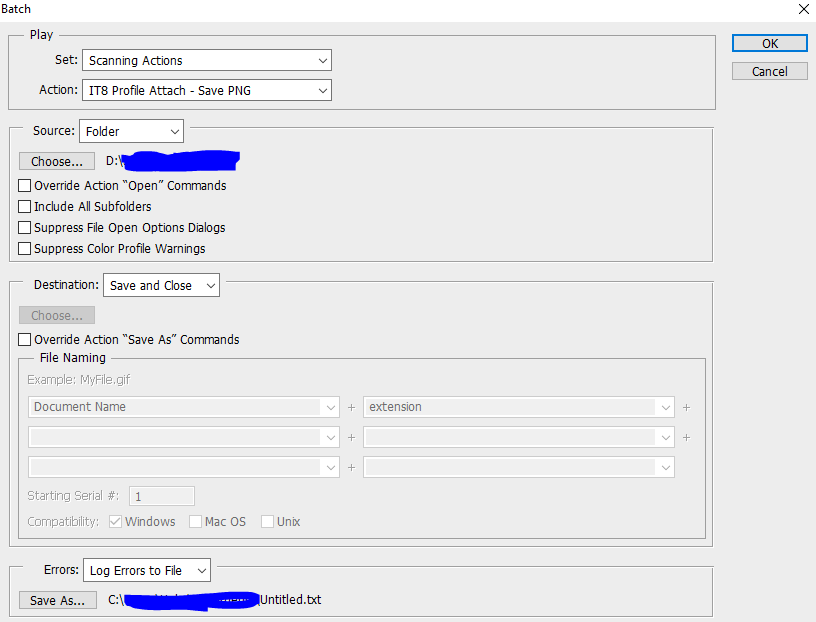
You'll need to drop down your Set to the proper set and action to the proper action you want to run. Once you do this it will remember the last one you have selected. Next you'll want to choose a source, I'll commonly choose Open Files or Folder depending on my uses. For this action we'll probably just have all our RAW TIFF scans sitting in a folder so set it for Foulder and click Choose and browse to it. Next I recommend setting Destination as Save and Close, and lastly at the bottom change Errors to “Log Errors to File” and Save As make it somewhere on your computer. Otherwise anytime something goes wrong your actions will freeze up with errors as they go. With this if you run into issues it will wait until it's tried to process all actions on all files before notifying you there was a problem. This is useful when you're doing something like running Sattva Descreen against a large amount of images and it fails to detect it properly (which is quite often).
After this just click OK and you should see your actions begin to run against your images. Come back after they're all done and see if they applied correctly to your images. That is how you setup a basic action, and honestly the sky is the limit with these things. I use them in all sorts of ways to automate stuff, so play around and experiment. I'll go over one more set I use quite often.
Generally I do the same things with minor adjustments on my RAW images when I convert them to JPEGs. Again I NEVER DELETE MY RAW IMAGES, the JPEGs are just extra images I include along with RAWs as they're prettied up and their file sizes are much smaller making them easier to use.
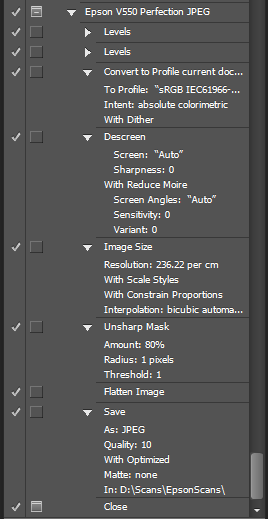
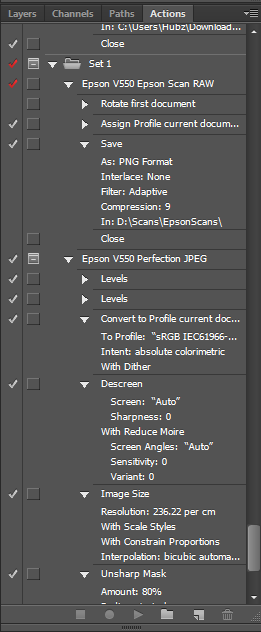
That is my command above you can mimic if you like, or feel free to take just bits and pieces of it for ideas and adjust. For this batch of images I did two separate levels adjustments that I thought produced good results for the material I was scanning at the time. After that step as you can see I convert from my IT8 profile to SRGB as that will allow my image to display properly in programs that are unable to render IT8 Profiles (Which is a lot of them including web browsers). Next up I am running Sattva Descreen against them with Automatic settings. However as I noted this sometimes produces improper results if Sattva detects the screen incorrectly. So let's tell it what screen to try and detect. Just so you know you can click any adjustable action in your action set to adjust it manually and it will remember the settings you pick. This can be used in all sorts of ways naturally but for this case I'm going to double click the Descreen action step to adjust it.

I had Automatic checked previously so I've unchecked it, I then clicked the box to the right of “Screen, Lines/inch” along the top to have it detect the screen. It found one it it thinks it's 177 which looks good to me. BUT with Sattva I have to manually adjust it for it to record that it isn't an automatic settings. So I move the slider off 177 and then back on it. After that I'll hit OK and my image will begin to descreen and record my action with this new value. We can see if it worked by looking at our action now.
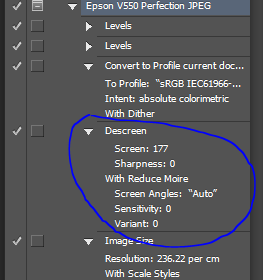
Instead of automatic it now knows I want to only descreen my images I run this action against at 177. If it is unable to find a screen at that it will leave the image open stop at this step, and move on to the next image in the batch. This is why I mentioned earlier it's a good idea to either have a machine with a lot of RAM or do smaller batches of images as when the Sattva step fails and it often can it will leave images open gobbling up resources. However it's a good thing as it lets us go in after the batch is over and try to manually set the screen properly or just skip the step entirely.
Let's segue into that for a second.To skip a step on any action set you simply click the checkbox on the left side of the action and it will skip it if it's unchecked. You'll notice too that after doing this your Action's name will have a red checkmark next to it which signifies that you are skipping a step in this action. Just a nice visual reference in case you forget. If you click an action step when an image is open it will highlight and if you press the play button along the bottom bar it will start at that action step and continue on down, which is another useful thing to know.
Alright so our next step in that action set is to shrink the image size down to 600DPI. The one after that is an Unsharp Mask setting i do that sharpens the image up very slightly which can help with blurriness caused by resizing, it's a very faint adjustment as I don't want to get crazy with it especially when I'm running it against a batch of images that may be quite different from each other.
Lastly I save my image as a JPEG and then close it. Again this action set saves me an incredible amount of time and the fact that I can adjust it on the fly for my uses and that it ALWAYS does the actions I tell it to allows me to cut down on human error in case I forget to resize my image, or convert it to SRGB etc.
Action Sets are VERY powerful and I highly recommend experimenting and using them if you're going to do a lot of post production/editing. It just makes your life so much easier imo.